
a friend wanted some feedback on his drawing of william hartnell (the first doctor who). so i decided rather than writing about how to fix it, i'd do a paint-over, with some writing. and since this totally won't fit into the limited comments space, i'm making it a post.
share and enjoy.
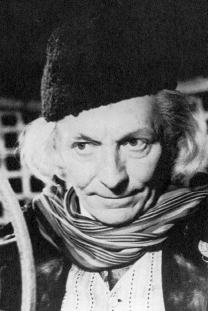
first, we have the original photo:
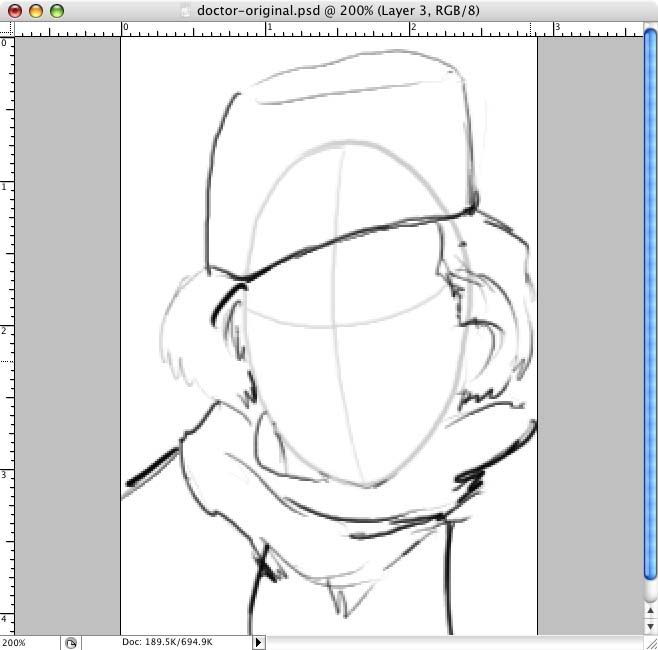
then your drawing:

[his self-critique is here.]
first off, everything i'm going to say is a dilution of what i've learnt from my teachers. i'm still learning, and have a ton to learn. remember that art is a sequentially-learnt skill, like math (you can't do calculus before you've learnt algebra), as well as a muscle-memory skill, like sports. it also requires wresting control of your mind back from your brain's left hemisphere, which isn't always easy to do. so given where you're at, you're making mistakes that are right in line with that number of drawings and skill level. i don't mean this to come off as condescending or like i know everything. i made the same mistakes when i was there, and now i just make totally different mistakes, ones commensurate with my skill level.
let's start with the most important thing to fix: getting your head around the idea that heads are round.
of course you know heads are round objects in space, not flat masks, but your left brain doesn't. our left brains want to make symbols out of everything, and are perfectly happy with using a smiley face or emoticon :) to represent a human face. this is great for quickly processing data, but bad for representing a 3D object in a 2D space. your left brain sees a sheet of paper, it sees a photo of a human face you want to copy, and it thinks, 'aha! i'll just make a face-like mask and put some features on it and we'll call it good!' you got some advice in your comments to turn the photo upside down and then copy it -- that technique is designed to shut your left brain up, get it to shrug and walk away, and let your right brain kick in and get on with the job of rendering a human head. there's an excellent and widely-used book, drawing on the right side of the brain, that's got a ton of techniques for how to do just this.
now that we know heads are round objects in space, not masks, how do we go about showing this on a sheet of paper? if we were sculptors, this would be easy. we'd just make a big head-shaped ball and begin either adding bits to it, or taking bits away from it until we have a head. but we don't have clay or marble -- we've got paper and something to mark on it with. there are lots and lots of fancy techniques to try to make this happen, but i prefer to do things the hard way. if you learn how to do this right, you'll be able to draw at a whole order of magnitude better than you're currently doing, and thus better than most humans. so listen up.
you have to not only learn the proportions of the human head, but you have to learn how to accurately see the proportions, too.
find yourself a ball you can mark on, or a wooden artist mannequin, or an orange, and draw a line that goes vertically, straight down the middle of the skull, that wraps around it, front, and back. then draw another line that wraps around it horizontally, at the level of the eyes/brow line. you should end up with a tiny little fake head you can play with. turn it all around, and notice how those lines move on the 'head.'
now, go read two of my teacher ron lemen's tutorials that've become ubiquitous on digital art forums:
1-the 3D objects in light and dark tutorial
2-the drawing the human head tutorial
and check out this page from andrew loomis' book, drawing the head and hands.
while i had this explained to me in high school, and i certainly practiced it a lot, it took a long, long time to get down. i still can't sit down and knock out a perfect head when looking at a live model because my drawing skills are nowhere near where they need to be. that said, let's start with the paint-over.
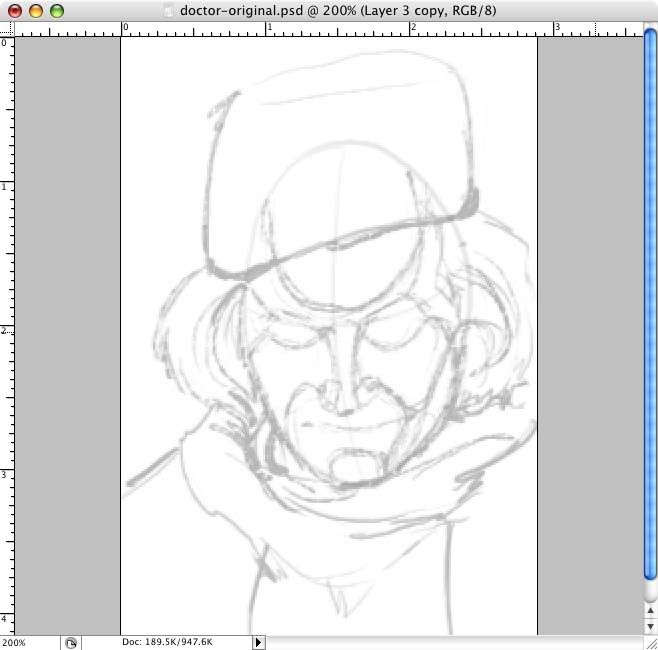
so, let's look at your drawing again:
your drawing with the basic head laid over it:

given that center line and eye line, the features aren't in the right place on the skull, which will throw off everything else you put on top of them.
your drawing with the basic shapes of the photo put in:

your drawing, with the abstraction laid over it:

if at this point, you feel like tearing up your paper and lighting it on fire, join the club; i think we all feel that way more often than not. however, my high school art teacher, donn morris, used to say, 'when i invented paper, i invented it with TWO sides. turn it over, and start again.'
let's take his advice and try a different way to construct this head and thus this drawing.
here's the basic head shape, drawn right over the photo:

now i block in the basic shapes i see in the photo: the hat, the scarf, the hair:
i lay in the abstraction lines of the face, focusing on the ones i see in the photo, given that high-contrast light and his face type and his age:
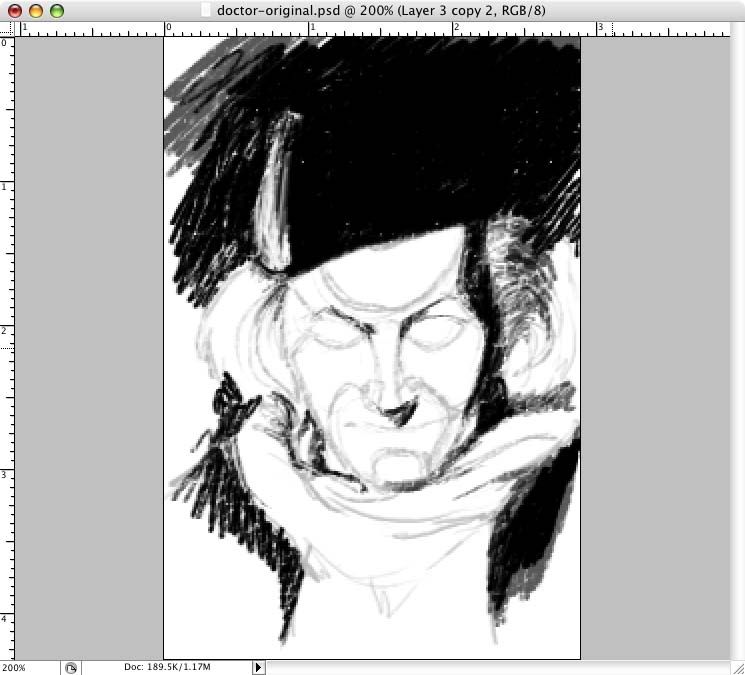
i put in the shadow pattern, so that i have a decent idea of where the darkest and lightest values are. i went really way too dark here -- you might want to draw them in lightly at first, then make them darker later:
now i focus on putting in the other values in the drawing, and showing that the forms of the head are rounded, by using light and dark values to get the form round. i'm not thinking about details at all, just about things like where his tooth cylinder is, how his cheek muscles fit into his jaw, etc. although i'm doing this paint-over in photoshop, i turned off the layer with the original photo a while ago and have just been using what little i know of the head anatomy to make my drawing:
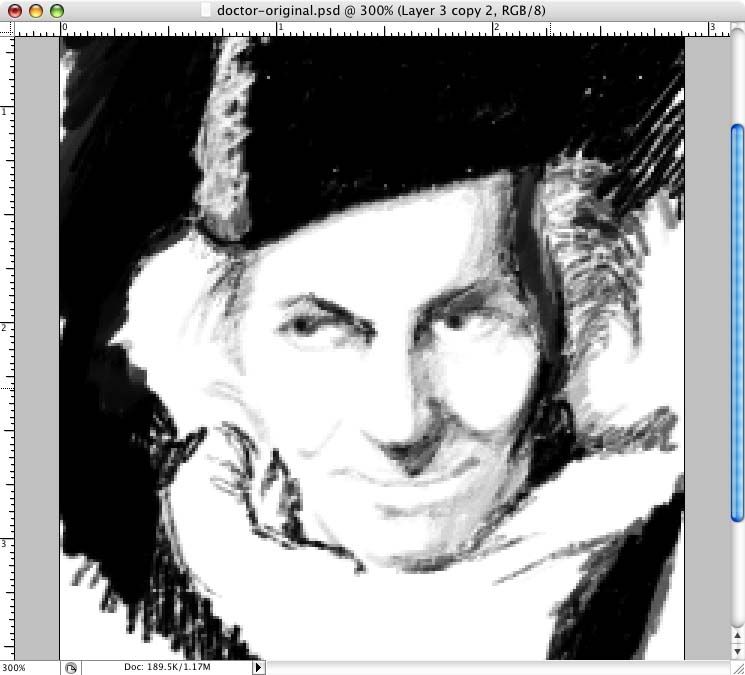
now i go in and work out some details, like the left side of his head (our left when looking at it), his hair, how to show that there's a scarf without drawing every single little fibre, fixing his hat, showing the texture of the hat without going crazy drawing to draw fluffy felt, etc. etc.

and because it's now been 20 minutes, and i still have to write this post and upload the photos, i call it good enough for now.
---
the things i recommend you focus on are practicing drawing wireframe head forms, with little indications for the eyes and nose. they're not 'cool' and they're not finished drawings, but getting a bunch of those in under your belt will help a lot the next time you want to copy a photo, because you'll have a good idea about where to put all those features, and why you're putting them there.
go look at and memorize the anatomy and perspective books ron listed:
andrew loomis' out-of-print bibles of drawing
Anatomy
Bridgeman's Complete Guide to Drawing from Life
Stephen Peck-Atlas of Human Anatomy for the Artist
John Vanderpoel-The Human Figure
Fritz Schider-An Atlas of Anatomy For Artists
Perspective
Dora Miriam Norton-Freehand Perspective and Sketching
Arthur Guptill-Sketching as a Hobby
Guptill-Sketching and Rendering in Pencil
Ernest Watson-Creative Perspective for Artists and Illustrators
practice drawing from these. don't worry so much about what materials you're using right now, as you've got much bigger problems ahead of you than how a particular brand of pencil is interacting with a particular type of paper. buying a metric butt-ton of supplies, thinking that'll fix your problems is really tempting, but it won't work until you fix the foundational problems you have.
good luck!